Candle Holder Tutorial

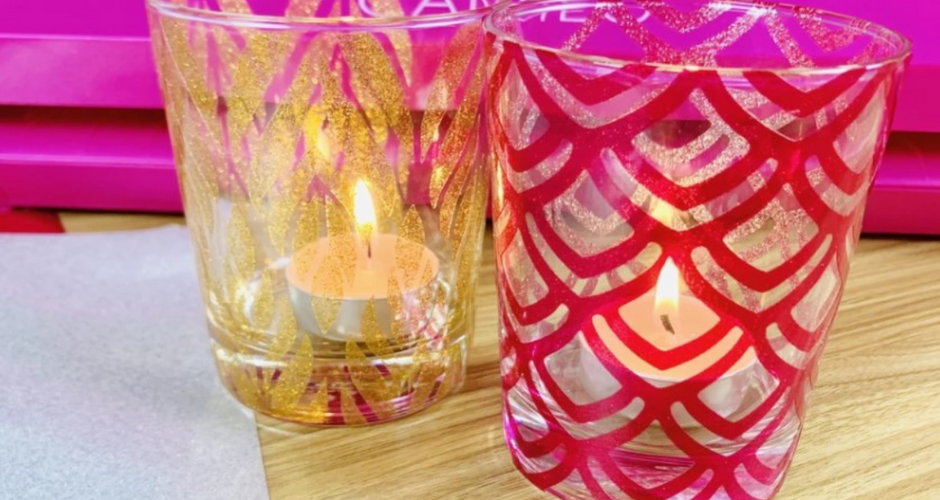

As you know, here at Vinyl World we are lovers of all things craft. There’s nothing better than sitting down and sampling new craft supplies and trying out new projects. Our monthly project boxes inspire you with a new and exciting project to get those creative juices flowing every month. They include everything you need to complete the monthly project, they inspire creativity and open up a whole new world of endless possibilities in the world of vinyl crafting. We are excited to announce our July Project Box is now ready! This month you will have the opportunity to make custom glass candle holders. These make a great gift and can be personalised to suit anyone! Get your cutting machine ready and let’s get started!
What is included:
2 x Glass Candle Holders
4 x StyleTech Transparent Glitter Adhesive Sheets (12inch x 7.5inch sheets)
1 x StyleTech Transfer Tape 1 metre
3 x SVG Files for customisation
What you’ll need:
- Scissors
- Personal cutting machine (Cricut, Brother scan 'n' cut, Silhouette Cameo etc.)
First and foremost, you’ll need to download the SVG files that will have been emailed to you upon purchasing your project box. Go ahead and import these into the software used for your cutting machine. Second, take your glass candle holders and go ahead and clean them down with an alcohol wipe or a clean cloth to ensure that there is no dust or residue on the glass. We always recommend using alcohol wipes as they are the sure fire way to ensure that you are left with a perfectly clean surface ready for your vinyl application.

Next, place your chosen vinyl onto your cutting mat and cut your design onto your preferred colours using the glitter adhesive setting on your machine. Always remember that if your design lifts, tears or does not come out cleanly, adjust your blade up or down. (HOT TIP * Cricut users may need to select Washi Tape for the more intricate designs.)
The next step is to weed your design by removing the excess vinyl that isn’t required using your weeding tool. Once your design has been completely weeded. Carefully apply your transfer tape over your base colour and mandala layer of your design. Included in your project box is our favourite, versatile squeegee. This squeegee makes life easy! Use this to transfer your design onto the tape. For those of you who are reading on and want to make your crafting life easier, you can purchase this brilliant tool here for only $3.

Turn your design over so that your design is facing your work surface. Go ahead and peel the start of the backing paper to expose the start of the design. If your design does not come free from the backing paper, take a little time to squeegee it further or use your weeding tool to help get it started.
Now the fun begins! Once your design is on your transfer tape, line it up with your glass candle holder, starting at the beginning of the design. Begin rolling the glass along the design. Slowly move at the start of the design. Start rolling the glass along the design slowly moving and peeling the backing paper exposing more of the design as you go. This will give you a flawless finish. Take your time and try to be precise.

Once you have finished, squeegee the design and slowly peel off the transfer tape. When you have finished, take the time to squeegee over your design. Then slowly peel off the transfer tape by rolling it back on itself. If any part of the design lifts, squeegee it a little further until the transfer tape comes free. Congratulations, you have just completed your first candle holder!

Also in Vinyl Hub